应用进程的组成
Android建立在Linux系统之上,基础的运行环境还是由进程组成。所有Android的应用进程都
是由Zygote 进程fork出来,因此,构成进程的底层基础,包括虚拟机、动态库等都是相同
的。除了从Zygote中继承而来的基础设施外,Android需要在应用的Java层建立一套框架来管
理运行的组件。由于应用的配置各不相同,因此,不能在Zygote中完全建好后再继承,只能
在应用启动时创建。而这套框架就构成了Android应用的基础。
ActivityThread
Android应用进程的核心是ActivityThread 类,App的真正入口。每启动一个App进程,都会
创建ActivityThread与之对应的实例,会调用main()开始运行,开启消息循环队列,这就是传
说中的UI线程或者叫主线程。这个类包含了应用框架中其他重要的类。
public final class ActivityThread {
...
  final ApplicationThread mAppThread = new ApplicationThread();
  final Looper mLooper = Looper.myLooper();
  final H mH = new H();
  Application mInitialApplication;
  Instrumentation mInstrumentation;
  private final ResourcesManager mResourcesManager;
  final ArrayMap<IBinder, ActivityClientRecord> mActivities = new ArrayMap<>();
  final ArrayMap<IBinder, Service> mServices = new ArrayMap<>();
   final ArrayMap<String, WeakReference<LoadedApk>> mPackages = new ArrayMap<String, WeakReference<LoadedApk>>();
  final ArrayMap<String, WeakReference<LoadedApk>> mResourcePackages = new ArrayMap<String, WeakReference<LoadedApk>>();
  final ArrayMap<ProviderKey, ProviderClientRecord> mProviderMap = new ArrayMap<ProviderKey, ProviderClientRecord>();
  ...
  public static void main(String[] args) {
    SamplingProfilerIntegration.start();
    // CloseGuard defaults to true and can be quite spammy.We
    // disable it here, but selectively enable it later (via
    // StrictMode) on debug builds, but using DropBox, not logs.
    CloseGuard.setEnabled(false);
    Environment.initForCurrentUser(); // 初始化应用中需要使用的系统路径
    // Set the reporter for event logging in libcore
    EventLogger.setReporter(new EventLoggingReporter());
    Process.setArgV0("<pre-initialized>"); // 设置进程名称
    Looper.prepareMainLooper();
    ActivityThread thread = new ActivityThread(); // 创建ActivityThread实例
    thread.attach(false); // 调用attach
    if (sMainThreadHandler == null) { // 保存主线程的handler
        sMainThreadHandler = thread.getHandler();
      }
    AsyncTask.init(); // 初始化AsynTask类
    Looper.loop(); // 进入消息循环
    throw new RuntimeException("Main thread loop unexpectedlyexited");
  }
...
/**
* 调用mH发送消息排队处理事件
*/
  private void sendMessage(int what, Object obj, int arg1, int
  arg2, boolean async) {
    Message msg = Message.obtain();
    msg.what = what;
    msg.obj = obj;
    msg.arg1 = arg1;
    msg.arg2 = arg2;
    if (async) {
      msg.setAsynchronous(true);
    }
    mH.sendMessage(msg);
    }
    ...
  }
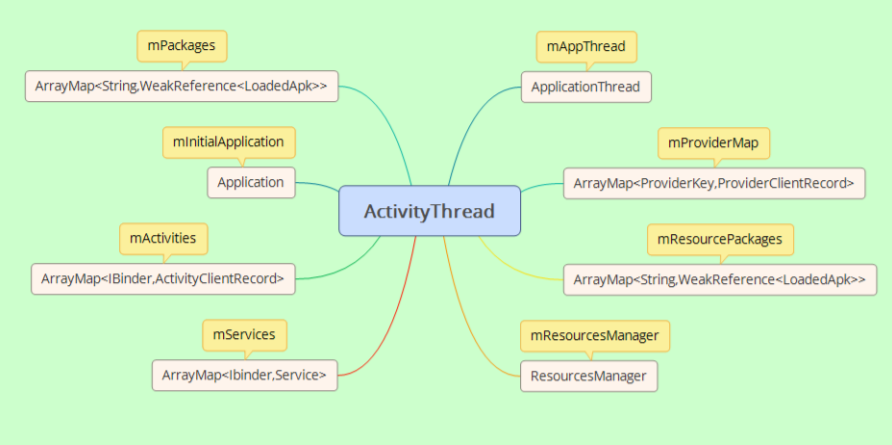
我们梳理一下这个ActivityThread类:

mActivities、mServices和mProviderMap分别保存了应用中所有的Activity对象、Service对象和ContentProvider对象。BroadcastReceiver对象的生命周期很短暂,属于调用一次运行一次的类型,因此不需要保存其对象。
mInitialApplication变量是一个唯一的Application对象,允许自定义。mResourceManager管理应用的资源。
mPackages和mResourcesPackages保存的是应用apk包的信息。(比如,通过属性process设置相同的应用名称后,两个有着相同ShareUserId和签名的应用可以合并在同一个进程运行)
ActivityThread 管理应用进程的主线程的执行(相当于普通Java程序的main入口函数),并根据AMS的要求(通过IApplicationThread接口,AMS为Client、ActivityThread.ApplicationThread为Server)负责调度和执行四大组件activities、services、broadcasts、providers,以及其它操作。
main()方法
main()法的逻辑比较简单,主要是初始化环境,然后让线程进入消息循环。在进行消息循环前,main方法创建了ActivityThread对象,并使用参数false调用了他的attach()方法。
attach()方法
我们看看attach()方法中参数为false时的分支代码:
private void attach(boolean system) {
  sCurrentActivityThread = this;
  mSystemThread = system;
  if (!system) {
    ......
    android.ddm.DdmHandleAppName.setAppName("<pre-initialized>",
    UserHandle.myUserId());
    RuntimeInit.setApplicationObject(mAppThread.asBinder());
    // 客户端调用ActivityManagerNative.getDefault()返回的是A
    ctivityManagerProxy
    // 也就是从ServiceManger获取AMS的IBinder对象
    final IActivityManager mgr = ActivityManagerNative.getDefault();
    try {
      logAppLaunchTime(TAG, "attachApplication -> AMS"); /// M: It's for debugging App Launch time
      mgr.attachApplication(mAppThread); // 调用AMS的attachApplication方法
    } catch (RemoteException ex) {
      // Ignore
    }
    ......
  } else {
    ......
  }
 }
}
attach()方法中主要做了两件事情,一是调用setApplicationObject()方法把对象mAppThread放到了RuntimeInit类中的静态变量mApplicationObject中。
public class RuntimeInit {
  ......
  public static final void setApplicationObject(Ibinder app) {
    mApplicationObject = app;
  }
  ......
}
第二件事情是调用ActivityManagerService的attachApplication方法,同时将mAppThread作为参数传递给了AMS中,这样AMS就能通过它来调用应用的接口了(Binder通信)。attachApplication方法最终实现是attachApplicationLocked。
public final class ActivityManagerService extends ActivityManagerNative
implements Watchdog.Monitor, BatteryStatsImpl.BatteryCallback {
    ......
  private final boolean attachApplicationLocked(IApplicationThread thread, int pid) {
      ......
    try {
      ......
      // 调用应用的bindApplication接口
      thread.bindApplication(processName, appInfo, providers, app.instrumentationClass,profilerInfo,
      app.instrumentationArguments, app.instrumentationWatcher,
      app.instrumentationUiAutomationConnection, testMode, enableOpenGlTrace,
      isRestrictedBackupMode || !normalMode, app.persistent,
      new Configuration(mConfiguration), app.compat,
      getCommonServicesLocked(app.isolated),
      mCoreSettingsObserver.getCoreSettingsLocked());
      ......
    } catch (Exception e) {
      ......
      return false;
    }
    ......
  // See if the top visible activity is waiting to run in this process...
  if (normalMode) {
    try {
      // 调用mStackSupervisor.attachApplicationLocked接口
      // 如果进程没有启动,最后就是调用realStartActivityLocked()启动进程
      if (mStackSupervisor.attachApplicationLocked(app)) {
        didSomething = true;
      }
    } catch (Exception e) {
      badApp = true;
    }
  }
  // Find any services that should be running in this process...
    if (!badApp) {
      try {
        didSomething |= mServices.attachApplicationLocked(app, processName);
      } catch (Exception e) {
        Slog.e(TAG, "Exception thrown starting services in " + app, e);
        badApp = true;
      }
    }
    // Check if a next-broadcast receiver is in this process...
    if (!badApp && isPendingBroadcastProcessLocked(pid)) {
    try {
      didSomething |= sendPendingBroadcastsLocked(app);
    } catch (Exception e) {
      // If the app died trying to launch the receiver we declare it 'bad'
      Slog.wtf(TAG, "Exception thrown dispatching broadcasts in " + app, e);
      badApp = true;
    }
  }
  ......
}
  ......
}
attachApplicationLocked()方法首先检查调用的参数,然后又回调ApplicationThread的接口bindApplication(),bindApplication()发送完消息BIND_APPLICATION然后就返回了,这样执行过程就转到应用的消息处理代码中。除了开启Activity能启动进程外,启动Service、发送广播也可能需要启动进程,因此,这里也调用了mServices.attachApplication()方法,以及sendPendingBroadcastsLocked来启动进程。
下面再回头看看ActivityThread是如何处理BIND_APPLICATION消息的。
private void handleBindApplication(AppBindData data) {
  mBoundApplication = data;
  // 创建系统配置对象
  mConfiguration = new Configuration(data.config);
  mCompatConfiguration = new Configuration(data.config);
  ......
  // 设置进程的名称和DDMS中的进程名
  Process.setArgV0(data.processName);
  android.ddm.DdmHandleAppName.setAppName(data.processName,
  UserHandle.myUserId());
  if (data.persistent) {
    // 带有Persistent标记的进程在低内存的设备上不能使用硬件加速
    if (!ActivityManager.isHighEndGfx()) {
      /// M: ALPS01978329 for 512m project
      final long LOW_MEMORY_SIZE = 256 * 1024 * 1024;
      MemInfoReader minfo = new MemInfoReader();
      minfo.readMemInfo();
      if ((minfo.getTotalSize() <= LOW_MEMORY_SIZE) ||
        (!"com.android.systemui".equals(data.processName))) {
        HardwareRenderer.disable(false);
        Slog.w(TAG, "Disable HWUI for Process(" + data.processName + "); Total Memory = " + minfo.getTotalSize());
      }
    }
  }
  ......
  // 用系统的配置设置应用的时区
  TimeZone.setDefault(null);
  // 用系统的配置设置应用的地区
  Locale.setDefault(data.config.locale);
  // 生成资源管理对象mResourcesManager,并用系统配置初始化
  mResourcesManager.applyConfigurationToResourcesLocked(data.config, data.compatInfo);
  mCurDefaultDisplayDpi = data.config.densityDpi;
  applyCompatConfiguration(mCurDefaultDisplayDpi);
  ......
  // 生成ContentImpl对象
  final ContextImpl appContext = ContextImpl.createAppContext(this, data.info);
  if (!Process.isIsolated()) {
    // 设置cache目录
    final File cacheDir = appContext.getCacheDir();
    if (cacheDir != null) {
      // Provide a usable directory for temporary files
      System.setProperty("java.io.tmpdir", cacheDir.getAbsolutePath());
    } else {
      Log.v(TAG, "Unable to initialize \"java.io.tmpdir\" property due to missing cache directory");
    }
    // Use codeCacheDir to store generated/compiled graphics code
    final File codeCacheDir = appContext.getCodeCacheDir();
    if (codeCacheDir != null) {
      setupGraphicsSupport(data.info, codeCacheDir);
    } else {
      Log.e(TAG, "Unable to setupGraphicsSupport due to missing code-cache directory");
    }
  }
  ......
  IBinder b = ServiceManager.getService(Context.CONNECTIVITY_SERVICE);
  if (b != null) {
  // 设置网络代理
  IConnectivityManager service = IConnectivityManager.Stub.asInterface(b);
  try {
    final ProxyInfo proxyInfo = service.getProxyForNetwork(null);
    Proxy.setHttpProxySystemProperty(proxyInfo);
  } catch (RemoteException e) {

  }
  }
  if (data.instrumentationName != null) {
    ......
  } else { // 创建Instrumentation对象
    mInstrumentation = new Instrumentation();
  }
  if ((data.appInfo.flags&ApplicationInfo.FLAG_LARGE_HEAP)!= 0) {
    // 如果应用指定使用big heap,则清除dalvik中的限制
    dalvik.system.VMRuntime.getRuntime().clearGrowthLimit();
  } else {
    // Small heap, clamp to the current growth limit and let the heap release
    // pages after the growth limit to the non growth limit capacity. b/18387825
    dalvik.system.VMRuntime.getRuntime().clampGrowthLimit();
  }
  final StrictMode.ThreadPolicy savedPolicy = StrictMode.allowThreadDiskWrites();
  try {
    // 最终,生成Application对象
    Application app = data.info.makeApplication(data.restrictedBackupMode, null);
    mInitialApplication = app;
    if (!data.restrictedBackupMode) {
      List<ProviderInfo> providers = data.providers;
      if (providers != null) {
      // 初始化应用的ContentProvider
      installContentProviders(app, providers);
      // For process that contains content providers, we want to
      // ensure that the JIT is enabled "at some point".
      mH.sendEmptyMessageDelayed(H.ENABLE_JIT, 10*1000);
    }
  }
  try {
    // 调用mInstrumentation对象的onCreate()方法
    mInstrumentation.onCreate(data.instrumentationArgs);
  } catch (Exception e) {
    throw new RuntimeException("Exception thrown in onCreate() of "
    + data.instrumentationName + ": " + e.toString(), e);
  }
  try {
    // 调用Application对象的onCreate()方法
    mInstrumentation.callApplicationOnCreate(app);
  } catch (Exception e) {
    if (!mInstrumentation.onException(app, e)) {
      throw new RuntimeException(
      "Unable to create application " + app.getClass().getName() + ": " + e.toString(), e);
    }
  }
  } finally {
    StrictMode.setThreadPolicy(savedPolicy);
  }
}
handleBindApplication()方法的主要功能就是创建应用框架中的各种对象,这些对象大都已经
介绍过了。最终调用到应用的Application.onCreate(),整个应用进程也就创建完毕。


近期评论