消息的处理最终会调用ActivityThread类的某个方法完成。
通过这种模式,从Binder来的调用就转换成异步的方式来执行了。理解了这个过程之后,再分析ApplicationThread类的接口是时,我们可以忽略中间的消息传递过程,直接查看ActivityThread中对应的方法。
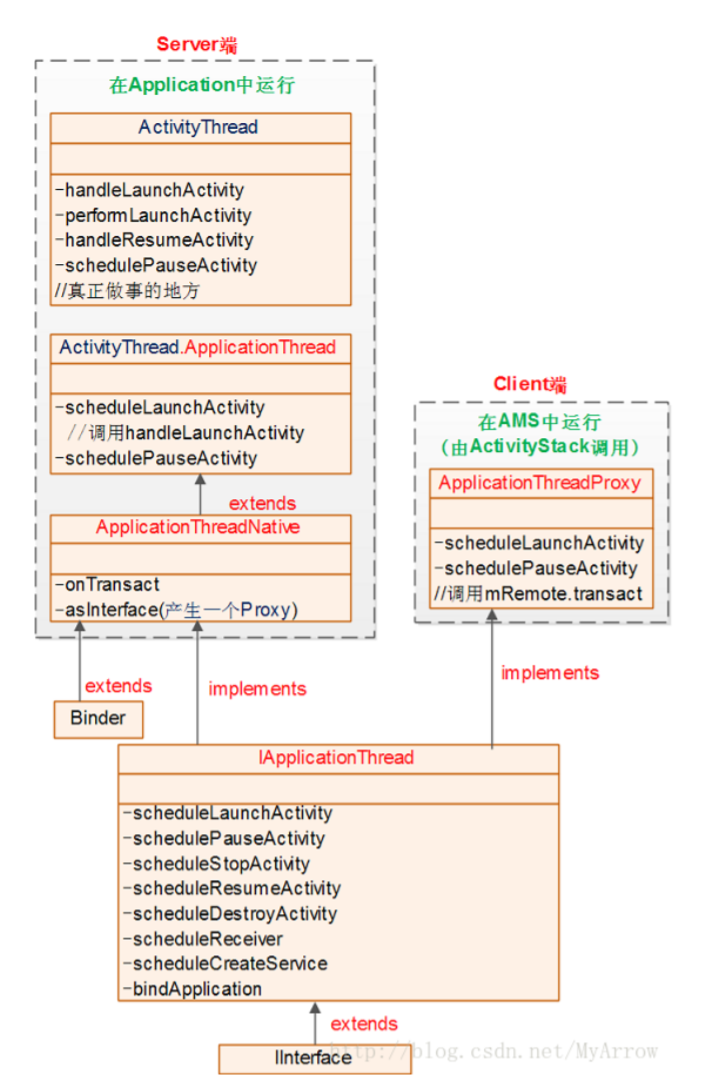
由此我们可以得到ActivityThread框架图:

通常ApplicationThread中的接口方法都是以“schedule”开头,而ActivityThread中对
应的处理方法则以“handle”开头。
Activity的创建并回调onCreate()
ActivityThread中的成员变量mActivities中保存了所有ActivityClientRecord对象,该类中重要
的成员变量如下:
static final class ActivityClientRecord {
  IBinder token; // Activity对象的全局唯一标示
  Intent intent; // 启动Activity的Intent
  Activity activity; // Activity对象
  Window window; // Activity的窗口对象
  boolean paused; // 是否在暂停状态的标志
  boolean stopped; // 是否在停止状态的标志
  ActivityInfo activityInfo; // Activity的信息
  LoadedApk packageInfo; // 包的信息
}
token的类型是IBinder,在ActivityManagerService中会为每个应用程序中的Activity对象建立
了一个对应的ActivityRecord对象,ActivityRecord会创建一个token对象来作为Activity的标
识。这个token是个Binder对象,但是它不是为提供Binder服务而创建的,这里只是利用
Binder对象的 系统全局唯一性 来作为标识符。
每一个Activity都包含了一个Window对象,Window对象关联着应用框架的一大块内容。
从上面的框架图我们可以得知:启动一个Activity,首先会经过AMS和ActivityThread之间又长
又臭的调用和回调,最终才会调到ActivityThread的handleLaunchActivity()方法。下面我们看
一下接下来的流程。
handleLaunchActivity
 /**
     * Extended implementation of activity launch. Used when server requests a launch or relaunch.
     */
    @Override
    public Activity handleLaunchActivity(ActivityClientRecord r,
            PendingTransactionActions pendingActions, Intent customIntent) {
        // If we are getting ready to gc after going to the background, well
        // we are back active so skip it.
        unscheduleGcIdler();
        mSomeActivitiesChanged = true;

        if (r.profilerInfo != null) {
            mProfiler.setProfiler(r.profilerInfo);
            mProfiler.startProfiling();
        }

        // Make sure we are running with the most recent config.
        handleConfigurationChanged(null, null);

        if (localLOGV) Slog.v(
            TAG, "Handling launch of " + r);

        // Initialize before creating the activity
        if (!ThreadedRenderer.sRendererDisabled
                && (r.activityInfo.flags & ActivityInfo.FLAG_HARDWARE_ACCELERATED) != 0) {
            HardwareRenderer.preload();
        }
        WindowManagerGlobal.initialize();

        // Hint the GraphicsEnvironment that an activity is launching on the process.
        GraphicsEnvironment.hintActivityLaunch();

         // 执行Activity创建和onCreate流程
        final Activity a = performLaunchActivity(r, customIntent);

        if (a != null) {
            r.createdConfig = new Configuration(mConfiguration);
            reportSizeConfigurations(r);
            if (!r.activity.mFinished && pendingActions != null) {
                pendingActions.setOldState(r.state);
                pendingActions.setRestoreInstanceState(true);
                pendingActions.setCallOnPostCreate(true);
            }
        } else {
            // If there was an error, for any reason, tell the activity manager to stop us.
            try {
                ActivityTaskManager.getService()
                        .finishActivity(r.token, Activity.RESULT_CANCELED, null,
                                Activity.DONT_FINISH_TASK_WITH_ACTIVITY);
            } catch (RemoteException ex) {
                throw ex.rethrowFromSystemServer();
            }
        }

        return a;
    }
handleLaunchActivity()再调用performLaunchActivity()方法来创建Activity并执行onCreate流
程,返回后再执行Activity的onResume流程。
   /**  Core implementation of activity launch. */
    private Activity performLaunchActivity(ActivityClientRecord r, Intent customIntent) {
        // 首先,从ActivityClientRecord中获取待启动的Activity的组件信息
        ActivityInfo aInfo = r.activityInfo;
        // 获取Activity的packageInfo
        if (r.packageInfo == null) {
            r.packageInfo = getPackageInfo(aInfo.applicationInfo, r.compatInfo,
                    Context.CONTEXT_INCLUDE_CODE);
        }

        // 获取Activity的ComponentName
        ComponentName component = r.intent.getComponent();
        if (component == null) {
            component = r.intent.resolveActivity(
                mInitialApplication.getPackageManager());
            r.intent.setComponent(component);
        }

        if (r.activityInfo.targetActivity != null) {
            component = new ComponentName(r.activityInfo.packageName,
                    r.activityInfo.targetActivity);
        }

        ContextImpl appContext = createBaseContextForActivity(r);
        Activity activity = null;
        try {
             // 拿到加载Activity的ClassLoader, 创建Activity对象
            java.lang.ClassLoader cl = appContext.getClassLoader();
            activity = mInstrumentation.newActivity(
                    cl, component.getClassName(), r.intent);
            StrictMode.incrementExpectedActivityCount(activity.getClass());
            r.intent.setExtrasClassLoader(cl);
            r.intent.prepareToEnterProcess();
            if (r.state != null) {
                r.state.setClassLoader(cl);
            }
        } catch (Exception e) {
            if (!mInstrumentation.onException(activity, e)) {
                throw new RuntimeException(
                    "Unable to instantiate activity " + component
                    + ": " + e.toString(), e);
            }
        }
        try {
            // 拿到当前进程中的Application对象
            Application app = r.packageInfo.makeApplication(false, mInstrumentation);

            if (localLOGV) Slog.v(TAG, "Performing launch of " + r);
            if (localLOGV) Slog.v(
                    TAG, r + ": app=" + app
                    + ", appName=" + app.getPackageName()
                    + ", pkg=" + r.packageInfo.getPackageName()
                    + ", comp=" + r.intent.getComponent().toShortString()
                    + ", dir=" + r.packageInfo.getAppDir());

            if (activity != null) {
                CharSequence title = r.activityInfo.loadLabel(appContext.getPackageManager());
                Configuration config = new Configuration(mCompatConfiguration);
                if (r.overrideConfig != null) {
                    config.updateFrom(r.overrideConfig);
                }
                if (DEBUG_CONFIGURATION) Slog.v(TAG, "Launching activity "
                        + r.activityInfo.name + " with config " + config);
                Window window = null;
                if (r.mPendingRemoveWindow != null && r.mPreserveWindow) {
                    window = r.mPendingRemoveWindow;
                    r.mPendingRemoveWindow = null;
                    r.mPendingRemoveWindowManager = null;
                }

                // Activity resources must be initialized with the same loaders as the
                // application context.
                appContext.getResources().addLoaders(
                        app.getResources().getLoaders().toArray(new ResourcesLoader[0]));

                appContext.setOuterContext(activity);
                activity.attach(appContext, this, getInstrumentation(), r.token,
                        r.ident, app, r.intent, r.activityInfo, title, r.parent,
                        r.embeddedID, r.lastNonConfigurationInstances, config,
                        r.referrer, r.voiceInteractor, window, r.configCallback,
                        r.assistToken);

                if (customIntent != null) {
                    activity.mIntent = customIntent;
                }
                r.lastNonConfigurationInstances = null;
                checkAndBlockForNetworkAccess();
                activity.mStartedActivity = false;
                int theme = r.activityInfo.getThemeResource();
                if (theme != 0) {
                    activity.setTheme(theme);
                }

                activity.mCalled = false;
                if (r.isPersistable()) {
                    mInstrumentation.callActivityOnCreate(activity, r.state, r.persistentState);
                } else {
                    mInstrumentation.callActivityOnCreate(activity, r.state);
                }
                if (!activity.mCalled) {
                    throw new SuperNotCalledException(
                        "Activity " + r.intent.getComponent().toShortString() +
                        " did not call through to super.onCreate()");
                }
                r.activity = activity;
                mLastReportedWindowingMode.put(activity.getActivityToken(),
                        config.windowConfiguration.getWindowingMode());
            }
            r.setState(ON_CREATE);

            // updatePendingActivityConfiguration() reads from mActivities to update
            // ActivityClientRecord which runs in a different thread. Protect modifications to
            // mActivities to avoid race.
            synchronized (mResourcesManager) {
                mActivities.put(r.token, r);
            }

        } catch (SuperNotCalledException e) {
            throw e;

        } catch (Exception e) {
            if (!mInstrumentation.onException(activity, e)) {
                throw new RuntimeException(
                    "Unable to start activity " + component
                    + ": " + e.toString(), e);
            }
        }

        return activity;
    }
从上面代码我们发现,ActivityThread最后调用了mInstrumentation变量的newActivity()方法来
创建Activity对象,并回调了callActivityOnCreate()方法,走完Activity的onCreate流程。
frameworks/base/core/java/android/app/Instrumentation.java
/**
     * Perform calling of an activity's {@link Activity#onCreate}
     * method.  The default implementation simply calls through to that method.
     *
     * @param activity The activity being created.
     * @param icicle The previously frozen state (or null) to pass through to onCreate().
     */
    public void callActivityOnCreate(Activity activity, Bundle icicle) {
        prePerformCreate(activity);
        activity.performCreate(icicle);
        postPerformCreate(activity);
    }
frameworks/base/core/java/android/app/Activity.java
@UnsupportedAppUsage
final void performCreate(Bundle icicle, PersistableBundle persistentState) {
dispatchActivityPreCreated(icicle);
mCanEnterPictureInPicture = true;
// initialize mIsInMultiWindowMode and mIsInPictureInPictureMode before onCreate
final int windowingMode = getResources().getConfiguration().windowConfiguration
.getWindowingMode();
mIsInMultiWindowMode = inMultiWindowMode(windowingMode);
mIsInPictureInPictureMode = windowingMode == WINDOWING_MODE_PINNED;
restoreHasCurrentPermissionRequest(icicle);
if (persistentState != null) {
onCreate(icicle, persistentState);
} else {
onCreate(icicle);
}
EventLogTags.writeWmOnCreateCalled(mIdent, getComponentName().getClassName(),
"performCreate");
mActivityTransitionState.readState(icicle);
mVisibleFromClient = !mWindow.getWindowStyle().getBoolean(
com.android.internal.R.styleable.Window_windowNoDisplay, false);
mFragments.dispatchActivityCreated();
mActivityTransitionState.setEnterActivityOptions(this, getActivityOptions());
dispatchActivityPostCreated(icicle);
}
这样Activity在应用端进程ActivityThread的启动流程和生命周期回调流程都简单分析完了。
小结一下 :
AMS通过Binder进行IPC通讯,通知应用进程ActivityThread启动指定Activity
调用ApplicationThread.scheduleLaunchActivity()。
经过Handler消息传动,调用ActivityThread.handleLaunchActivity()。
调用ActivityThread.performLaunchActivity()完成Activity的加载,并最终调用Activity生
命周期的onCreate()方法
performLaunchActivity返回,继续调用ActivityThread.handleResumeActivity(),该方法
内部又调用ActivityThread.performResumeActivity(),其内部仅仅调用了目标Activity的
onResume()方法。到此Activity启动完成。
Activity的其他生命周期方法onRestart等,可以根据onCreate流程为类推,举一反三。


近期评论